


To extrude in Blender, select your object, press Tab to enter Edit Mode, select a vertex, edge, or face, and press the E key. You can then pull your mouse to stretch the geometry and left-click to lock it in place. Mastering this simple shortcut is the fundamental key to creating any complex 3D shape.
Have you ever stared at a blank gray cube in Blender and wondered how 3D artists turn it into a majestic castle, a sleek spaceship, or a cute character? It feels like magic when you see a flat shape suddenly grow into a detailed 3D masterpiece. The secret behind this magic is a simple tool called extrusion. It is the literal building block of almost every 3D model you will ever create.
When you first open up the software, the interface can look a bit scary. There are buttons, menus, and shortcuts everywhere. You might find yourself asking, how to extrude in Blender? Do not worry, because it is much easier than it looks. Once you learn the basic steps, your fingers will do it automatically without you even thinking.
In this guide, we will break down the process step by step. We will cover the basic shortcuts, look at advanced menu options, and help you avoid the most common mistakes that catch beginners off guard. Grab a cup of coffee, open up your project, and let us dive into the wonderful world of 3D modeling!
Key Takeaways
- The Core Shortcut: Pressing “E” in Edit Mode is the universal shortcut to start extruding.
- Locking Axis: You can constrain extrusion to the X, Y, or Z axis by pressing the corresponding key after hitting E.
- Extrude Along Normals: Using Alt + E opens a menu to extrude faces along their natural directions.
- Individual Extrusion: Extruding individual faces keeps them separate rather than joining them together.
- Avoid Duplicate Geometry: Pressing Escape after E doesn’t cancel the extrusion; it leaves overlapping vertices that you must merge.
Quick Answers to Common Questions
What is the keyboard shortcut to extrude in Blender?
The keyboard shortcut to extrude in Blender is the “E” key when you are in Edit Mode.
How do I cancel an extrusion without leaving double vertices?
To cancel an extrusion completely, press Ctrl + Z immediately after canceling the mouse movement to undo the action.
How do you extrude multiple faces individually?
Select your faces, press Alt + E to open the extrusion menu, and choose “Extrude Individual Faces” from the list.
Can you extrude vertices and edges in Blender?
Yes, you can select individual vertices or edges and press E to extrude them into lines or flat planes.
How do I extrude along a specific axis?
Press E to start the extrusion, and then press X, Y, or Z to lock the movement to that specific axis.
📑 Table of Contents
The Basics of Extrusion in Blender
Before we press any buttons, let us understand what extrusion actually does. Imagine holding a playdough press. When you push the playdough through the mold, it stretches out and takes on a new 3D shape. In Blender, extrusion does the exact same thing. It takes a point, a line, or a flat surface and stretches it out into a new dimension, creating brand new geometry along the way.
To start modeling, you need to transition from just looking at your object to actually editing it. This means you need to switch modes.
Step 1: Switch to Edit Mode
When you open Blender, you start in Object Mode. This mode lets you move whole objects around, but you cannot change their actual shape. To edit your mesh, select your object by left-clicking it. Then, press the Tab key on your keyboard. You will see your object change color, and small dots will appear on its corners. You are now in Edit Mode.
Step 2: Choose Your Selection Mode
At the top left of your viewport, you will see three small icons next to the word “Edit Mode.” These represent Vertices (points), Edges (lines), and Faces (flat surfaces). You can also switch between them by pressing the numbers 1, 2, or 3 on your main keyboard. Pick the mode you want. For beginners, Face Select (pressing 3) is usually the easiest way to see how extrusion works.
Step 3: Select and Extrude
Left-click on the face of your cube that you want to grow. Now, press the E key. Move your mouse slowly, and you will see a new section grow out of the cube. Once you are happy with the length, left-click to set it. Congratulations, you have just learned how to extrude in Blender!
Controlling Your Extrusions
Now that you know the basic move, let us talk about control. Sometimes, your extrusion might fly off in a weird direction. Blender tries to guess where you want the new shape to go, but it is not always correct. Luckily, you can guide it easily.
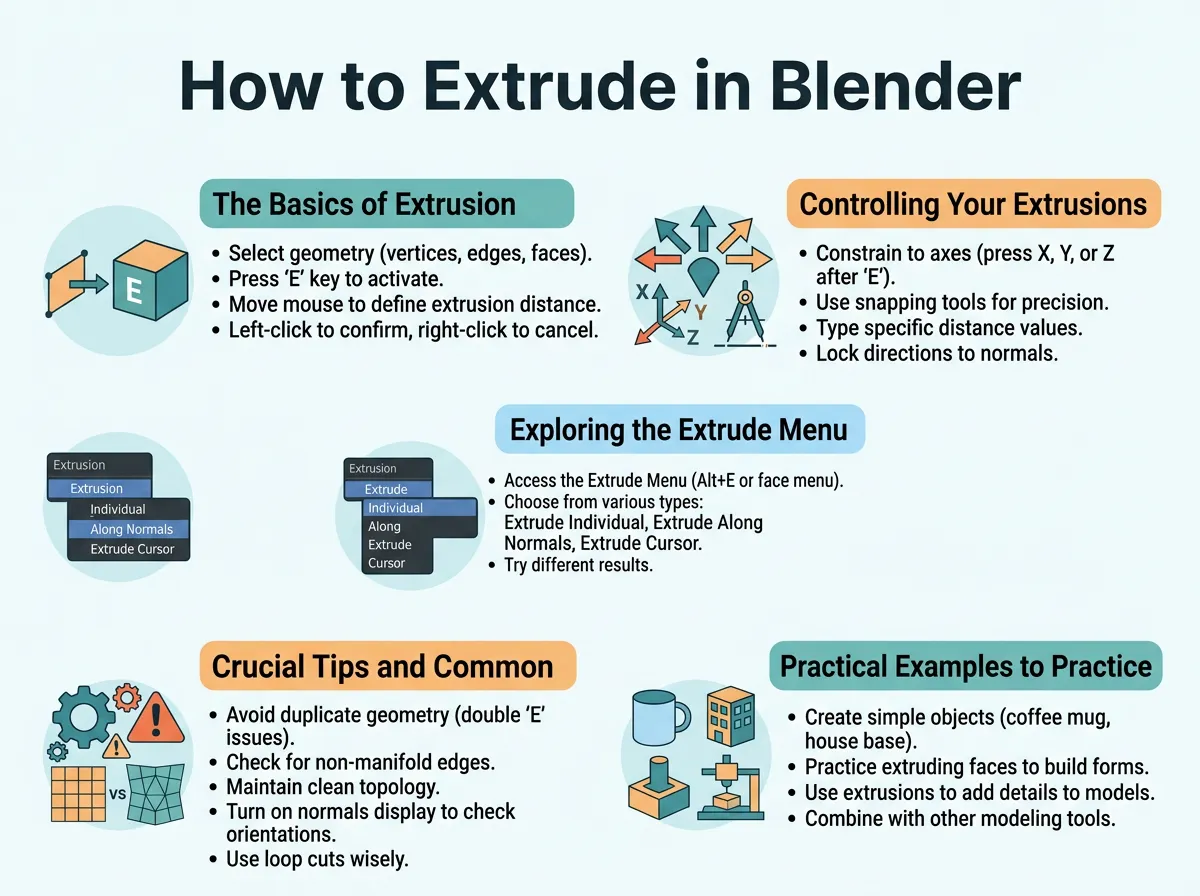
How to Extrude in Blender? — key points at a glance
Locking to an Axis
When you press E to extrude, Blender often locks the movement to the “normal” direction of the face. But what if you want it to go straight up? After pressing E, you can press Z to lock the movement to the blue vertical axis. You can also press X for the red axis or Y for the green axis. This keeps your models straight and neat. To understand how Blender processes these directions, you can consult the official Blender Extrude Manual for technical details.
Extruding with Precise Measurements
Do you need your model to be exact? You do not have to guess with your mouse. Press E, then type a number on your keyboard. If you type 2 and press Enter, Blender will extrude that face exactly two units. If you want it to go in the opposite direction, type -2 instead.
Exploring the Extrude Menu (Alt + E)
The standard “E” key is great, but it is just the tip of the iceberg. Blender has a secret menu that offers more powerful ways to stretch your shapes. To open this menu, select your geometry and press Alt + E on your keyboard.
Extrude Along Normals
Imagine you select three different sides of a cube and press E. They will all try to move in one average direction, which looks squished and messy. If you choose “Extrude Along Normals” from the Alt + E menu, each face will move outward in its own natural direction. This is perfect for making things like spiked collars or cylindrical pipes.
Extrude Individual Faces
What if you want those three faces to separate completely as they grow? The “Extrude Individual” option does exactly that. It treats each face as its own island. They will scale and stretch independently, leaving gaps between them. This is an incredible tool for creating architectural details, panels, or sci-fi patterns.
Extrude to Cursor
Did you know you can extrude without even touching the E key? Hold down the Ctrl key and right-click anywhere on your screen. Blender will automatically extrude your selected face directly to your mouse cursor. Keep clicking to draw organic shapes like tree branches or tails in seconds.
Crucial Tips and Common Mistakes to Avoid
Every 3D artist has made mistakes when learning how to extrude in Blender. Some of these mistakes can ruin your model and make it hard to apply textures or modifiers later. Let us make sure you avoid them!
The Cancel Extrude Trap
This is the number one mistake for beginners. You press E to extrude, change your mind, and press the Escape key or right-click to cancel. It looks like the face went back to normal, right?
Wrong! Pressing Escape cancels the movement, but it does not cancel the extrusion. You now have duplicate vertices sitting directly on top of each other. This creates “double geometry” which causes weird shadows, rendering errors, and issues when you try to smooth your model.
To fix this, always press Ctrl + Z to undo if you change your mind. If you think you already have duplicates, select your entire model with A, press M, and choose “By Distance” to clean up and merge any overlapping points. You can read more about managing these duplicate points in older projects via the Blender 2.82 Extrude Documentation, which covers legacy mesh behavior.
Keep an Eye on Your Normals
Normals are the direction that your faces are pointing. Inside faces point inward, and outside faces point outward. If you extrude inward by mistake, your model might turn inside out. If your shading looks dark, dirty, or blue and red in the face orientation overlay, select everything and press Shift + N to recalculate your normals.
Practical Examples to Practice Right Now
The best way to learn is by doing. Here are two quick projects you can build in less than five minutes using your new skills.
Project 1: A Simple Coffee Mug
Start with a cylinder. Select the top face and press I to inset it slightly. Now, press E and push your mouse down to extrude inward, creating the hole for the coffee. Next, go to the side of the mug. Select two faces, one near the top and one near the bottom. Extrude them outward. Finally, select the facing ends of those new blocks and bridge them to form the handle!
Project 2: A Classic Castle Tower
Start with a cylinder again. Select the top face and extrude it straight up. Scale it outward slightly to create a wider top ledge. Select the new top face, inset it, and extrude it downward slightly. Finally, select every second face along the very top rim and extrude them upward to create the classic castle battlements.
Conclusion
Learning how to extrude in Blender is like learning how to draw your very first line. It is a simple step, but it opens the door to infinite creative possibilities. By using shortcuts like E, mastering the Alt + E menu, and avoiding the trap of duplicate vertices, you are well on your way to becoming a skilled 3D modeler. Don’t be afraid to experiment, make mistakes, and build messy shapes. The more you practice, the more natural it will feel. Happy modeling!
Frequently Asked Questions
Why is my mesh looking weird or dark after extruding?
This usually happens when your faces are turned inside out, creating flipped normals. To fix this, select your entire model in Edit Mode by pressing A, and then press Shift + N to recalculate the normals.
How do I merge duplicate vertices caused by a canceled extrusion?
Select your entire mesh by pressing A in Edit Mode. Then, press M and click “By Distance” to merge any overlapping vertices that are sitting in the same spot.
What is the difference between Extrude and Inset?
Extrude pulls geometry outward or pushes it inward to create new 3D depth. Inset, which is done by pressing the I key, scales a new face inside the boundaries of the selected face without moving it forward or backward.
How can I extrude along a custom path?
You can use the “Extrude to Cursor” tool by holding Ctrl and right-clicking your mouse to make the geometry follow your cursor. For more complex paths, you can use a Curve modifier to guide your extruded mesh along a drawn line.
Why does my extrusion move in a strange diagonal direction?
By default, Blender extrudes along the average “normal” direction of the selected faces. If your faces are angled, the extrusion will be angled too, but you can override this by pressing X, Y, or Z to lock it to a global axis.
Is it possible to extrude without using keyboard shortcuts?
Yes, you can click the Extrude Region tool icon on the toolbar on the left side of your screen. This will give you a yellow plus-sign gizmo on your viewport that you can click and drag to extrude.
